Tuesday, January 23, 2018

ProTools Playback Engine, ProTools Aggregate I/O "forgets" Inputs/outputs when disconnecting/re-connecting audio interface

This is happening all too often and it's driving me a bit nuts: when disconnecting and re-connecting the audio interface (same device, native to macOs Sierra) onto my Mac, ProTools Aggregate in the Audio Devices of the Midi Setup goes south.

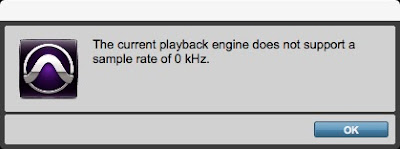
The output/input gets duplicated and ProTools Aggregate gets confused, acting as if there is no device. On launching ProTools, cahoots ensues:
Duh!

In the picture below, the PT Aggregate I/O is configured normally, and everything works.


Now if I move the computer to another job location, by necessity disconnecting and re-connecting the audio interface, often there is a DUPLICATE and GREYED OUT input/output that ProTools Aggregate I/O is stubbornly set onto. Like an invisible, non-existent device. Hence it produces the Playback engine message above.

I wonder why this behavior? Is it PT? Is it Audio/Midi Setup? Is it the Mac? Anyone of you having this problem on your setup and can share some light?

Wednesday, December 20, 2017

FCPX Missing Plug-in (Effect) difficult to track down - pt5 (X-FX Handler)

Couldn't hunt this missing Effect down, so I downloaded X-FX Handler from Spherico: http://www.spherico.com/filmtools/X-Files/X-FXHandler/

Exported an XML of the Project, loaded it into X-FX Handler, and Kaboom!
Look at this missing Hawaiki Effect! FASLE! That's right! But, but, hold on a second... That's fine and dandy, but WHERE CAN I FIND IT IN THE TIMELINE?

Ah! Ah! Here is the secret weapon: double click on the missing Effect and Kabaaahm!
It's enabled on CLIP0000180 - THAT I CAN SEARCH FOR IN THE INDEX.

Three Clip0000180 in my Timeline indeed, and the third one wins the missing Effect prize.
(It was actually OFF!) Delete. Good riddance.

Thank you Andreas Kiel, Spherico.

FCPX Missing Plug-in (Effect) difficult to track down - pt4

Here we are again at this topic: how to ID and find missing Effects, Titles and Transitions in FCPX? An ongoing battle.

See my two previous rants here:
http://humanuser.blogspot.com/2015/05/apple-has-to-make-it-easy-to-find.html
https://humanuser.blogspot.com/2017/02/missing-effects-and-titles-in-final-cut.html


Allright, so I discovered by inadvertence that FCPX (10.3.4) is giving SOME hints as to what is missing if you select the Project in the Browser, it will show SOME information.
Right, right, Hawaiki Color is missing, and Adjustment Layer is missing. That's progress.

It's better than showing this, right?

Unfortunately it doesn't help with finding the missing elements in the Timeline. I would like to jump to the actual place in the Timeline where this or these missing elements are being used and review and/or delete them. But I can't. Well for Titles, yes I can since I can isolate Titles in the Index.

So if there is already Titles listed in the Index, it's not too much asking that all other Effects, Generators and Transitions be added to the list, is it? And maybe it's not too much asking that any missing element be FLAGGED in the Index list, is it?

Thank you Apple.


Tuesday, December 19, 2017

How to render Apple Motion Projects by dropping them directly into Apple Compressor

I don't know if a lot of users are aware of this: you can render a Motion Project by dropping the file directly into Compressor.

I am working on a project with a really tight deadline and lots of graphics. To speed things up I am rendering graphics in Motion at Draft Quality settings, dropping them into the cut in order to expedite a screener for client approval.

For the final version though,  I want to re-render all my graphics at Better Quality settings, which is more time consuming.

Instead of loading each graphic into Motion, changing the settings to Best, and hitting Command+E, waiting for the render to complete, closing the project, opening the next one... There is a better option. It's kind of like "Send to Compressor", but better.

Open all Motion projects and switch the settings to Best and save them all. Then grab all the Motion Projects files and drop them into Compressor. Select the Preset, select the destination and let Compressor batch rendering! Much faster and streamlined.


Unfortunately, prior to batch rendering with Compressor, you must save each Motion project with the actual Render settings you want Compressor to render at. If the Project is set to render at Batch Quality inside Motion, that's what Compressor will render at. That's kind of a limitation.


There should be a way to override the Motion Render settings inside of Compressor, even better, since Compressor "understands" Motion project files, we should have access to all the Motion Render settings in the Job window inside Compressor. That would make this workflow more efficient, but I am not seeing anything of the sort.

 If you have a tip, please let me know in the comments. Thanks!
Monday, December 18, 2017

FCPX 10.3.4 The operation couldn't be completed. Invalid argument

Getting the error message from FCPX 10.3.4: "The operation couldn't be completed. Invalid argument" when trying to move a clip between Events.

Well the culprit in this case is a filename containing a dot (in addition to the dot extension), something like: "clip.ver.mp4"

FCPX doesn't like the dot in the filename, so I renamed the clip: "clip_ver.mp4", relinked the file and all is good.

Tuesday, December 12, 2017

Apple Compressor still cannot deal with XAVC-S or MXF files from Sony A7RII and FS5

Compressor 4.3.2, the current one, cannot open A7RII MP4 files.


It has no clue with FS5 MXF footage either and transcodes to an all black/empty file.

OK, mmhm, how long has this Sony codec been out again? Is this another codec war Sony and Apple are waging?

Short of using Sony's Catalyst software, you have Adobe Media Encoder and EditReady that can transcode your Sony footage to Prores on a Mac.

Good luck.

Adobe Premiere Pro Proxies

I'm testing the Proxy workflow with Adobe PP on a project shot in UHD, that will be delivered in HD. Ultimately I think that it's not a real advantage to use this proxy workflow against simply converting the original footage to something the computer can handle more easily - like Prores or DNxHR/HD.

I'm dealing with footage from two Sony cameras 
recorded internally in UHD 3840 x 2160 at 23.976.

A Sony FS5 recorded in MXF OP1a, XAVC Long QFHD, h264/MPEG-4 8bit 4:2:0 at 100Mbps. Clips have 4 mono audio channels.

A Sony A7RII recorded in MP4, XAVC-S, h264/MPEG-4 AVC Long Gop 8bit 4:2:0 at 100Mbps. Clips have one stereo audio channel.

Importing original MXF and MP4 footage into PP is no problem, but PP playback of original UHD footage is very clunky for both the A7RII MP4 and the FS5 MXF at any settings: full, 1/2, 1/4.

So I created two Proxy and Ingest Presets in AME, one for each audio config, and I'm transcoding to Prores Proxy HD 1920x1080.


It took approximately 4 hours for AME to transcode 120GB of footage overnight which is about 2hrs and 15min. in duration. So roughly TWICE real time. The resulting proxy files are roughly HALF the size of the originals.


Premiere hanged during that process, I had to restart the app. On restart, all the footage from Day2 was not in the project. I re-imported the footage from Day2 in PP. The Proxies didn't show in the Browser.

I selected all clips and selected Proxy/Attach Proxies and then pointed at the first Proxy file. All files got reconnected automatically to their proxies.


I have separate folders for Day1 and Day2, both for originals and Proxies. This is due to the fact that I have duplicated clip names, so I want to keep things compartmented.


Toggling Original and proxy footage is seamless, just use the toggle button. Playback of proxies is smooth.


Export Media automatically reverts to using the original UHD footage. Exporting a 5min. UHD Timeline (or HD Timeline with all clips at 50% scale)\ to Prores Proxy 1080p or to h264 720p takes about 6min., so a little more than real time.


OK, so that's Proxies so far.

Now instead of working with the proxy workflow, I can upfront convert the UHD XAVC footage to Prores UHD. PP is perfectly capable of smooth 4K Prores playback on my machine. Export Media time also falls to near real time. So, it is not 4K that taxes the machine as much as it is the Sony XAVC codec.

If I edit 50% scaled UHD Prores clips into a HD Timeline, PP playback is flawless as well. Export Media time is below real time.

AME conversion time to transcode to Prores UHD is roughly twice that of transcoding to HD Proxies. In this case it will take 8 hours vs. 4 hours as mentioned above. That's one drawback.

So, ultimately I think I will use the non proxy workflow. I don't see why I would want to go back to a clunky codec at any time during post. Remember with PP proxy workflow, you are dealing with original media XAVC codec on export. That is a real slowdown.

Transcoding to UHD Prores has all the advantages: UHD frame size allowing for repo in a HD Timeline, an easy to deal with codec for the computer, and relatively fast export times. If something is not right with a Prores clip, it's easy to re-transcode from the original.

Granted files are bigger in UHD Prores HQ, five time as big as the original XAVC files, that's the second drawback, but drive space is cheap, so not an issue on this project.

Transcoded to Prores HD, the size would be somewhat less, and it might take less time for AME to transcode, but it would restrict the reframing possibilities that UHD has to offer.