Monday, February 14, 2022

How To Run DisplayCal On Mac Mini M1

Since I upgraded to a silicon Mac M1, the Mac mini 2020, with macOS Monterey, I had to calibrate my dual monitors using DisplayCal. Only it would not work.

After searching for an answer, I found this very helpful post on Macrumors forum by user divinebaboon. Lovely name.

I ran my own experiment and it worked. Very similar to what's described in the post above, with a few differences.

I have one monitor connected via HDMI and a second monitor connected to a USB3 Type-C to HDMI hub. Both monitors are Viewsonic VX2370, OK for my use, not the best monitors around certainly. I'm using XRite i1 Display Pro puck for measurement.

Here is how I did it:

1) Download the current DisplayCal App at https://displaycal.net/#download. I got the "For Mac OSX (10.6 or newer), click on "Installer Package".

It brings you to a SourceForge page and downloads DisplayCal v. 3.8.9.3

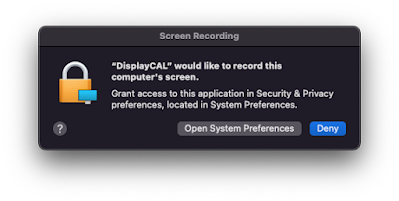
2) Install DisplayCal. It will show a window to allow DC to record your monitor, open System Preferences and allow it.


3) Plug your measuring device, start DisplayCal. It will prompt you to install the latest Argyll library. Do it, it will download an older version V2.1.2 as mentioned in the post. Quit DC.

4) Go to: https://www.argyllcms.com/downloadmac.html and download the latest executables. In my case v2.3.0

5) Untar the Argyll package with Unarchiver or your app of choice. It will look like this:

6) Go to: User/Library/Application Support/DisplayCal, and look into the "dl" folder. You will see the Argyll_V2.1.2 folder. Trash it and Empty Trash.

7) Move the Argyll_V2.3.0 folder into this dl folder. It should now look like this:

8) Restart DisplayCal, if it asks again for the Argyll Library, click on File/Locate ArgylCMS executables, and point it at the bin folder.

9) Start calibration. macOS will complain multiple times about Argyll executables that cannot be opened because the developer cannot be identified. Each time this happens, go to the Argyll_2.3.0/bin folder and manually open each executable by right-clicking on it. Then click on the alert Cancel button.

Here is an example with "iccgamut":

Right-clicking on iccgamut forces run the executable in Terminal:

Click Cancel only after Terminal is running the executable and the process is completed.

10) You have to do this each time macOS blocks an executable and it happens at different times during the calibration which lasted 9min. in my case. Eventually it goes through it all. Next time macOS should not block the executables, but if it does, employ the same technique.

11) On reboot DisplayCal sees both monitors just fine:

VX2370 (1) and (2) detected.

12) In my case I set the (Pre) Calibration Whitepoint to 6500K, White Level to 120cd/m2, and Tone Curve to Gamma 2.2 in DisplayCal.

I reset the monitors completely, switch the color profile from Native to User Color and adjust the RGB settings and the brightness setting to optimize them in the Interactive Display Adjustment. I do not adjust anything else in the monitors.

The VX2370 is not a performance monitor. I only just adjust the Colors and Brightness to be in the target ranges, I leave every other monitor settings to default.

13) The calibration goes through its paces. Click on Install profile and you are done. Do the same for the second monitor. Success!

One more thing: Sometimes DisplayCal freezes after the Install Profile, just force quit. Also randomly, one or both monitors will black-out when closing DisplayCal windows, like the Interactive Display Adjustment window. Just unplug and replug the HDMI cable and the signal will come back.

If you can, please contribute to the development of DisplayCal.


Thursday, February 3, 2022

Silicon Power SSD S55 Gone Burst After 4 Years

 Bought this Silicon Power Sata SSD 480GB in March of 2018. Yesterday, Feb 2 2022 it went kaput.

Silicon Power 480GB SSD 3D NAND S55 TLC 7mm

 It replaced an internal rotating drive in my Intel 2012 Mac Mini. The Mini is in use all day everyday from light to mild use in terms of data read/written. And a few weeks in the year it's put to heavy use. I have no idea how much that represents in terms of data size R/W unfortunately.

 In any case this is a SHORT lifespan for a SSD. Granted in was one of the cheapest back when I bought it, and SP have not won the price for reliability of their products that's for sure.

 Lesson: ALWAYS HAVE AN UP TO DATE BACKUP OF YOUR DATA. Best of course is to have several copies, but at least have one. I had an up to date clone (and a copy from last month) of the entire Mac mini Boot drive made with CCC. It has saved my bacon more than once.

 Now for the sequence of events: I noticed the Mac slowing down for a few weeks before, was getting the beach ball while on Safari or doing mundane actions. Didn't pay too much attention to it, only I made sure my clone was up to date. Left the clone drive attached and CCC to backup everyday.

In the morning this message popped from Adobe Creative Cloud:

"Adobe Creative Cloud is needed to resolve this problem. However it is missing or damaged."

Couldn't do a screen grab as you can see, as everything was slow like molasses. OK, so red alert ensued. I restarted from an external USB Mojave Boot Installer, fired Disk Utility and First Aid, which found the fsroot tree invalid and could not repair it. (The SSD was formatted APFS.) I tried a few times, same results, no go.


I tried to re-install Mojave to no avail. The installation would hang in the middle and not go through. I tried to erase the SSD and do a clean install, that failed as well.

Install frozen and not going anywhere.

I then decided to install a clean Mojave onto a new external SSD. I booted again from the USB Installer and that worked. The installation went through and I was able to start from the external SSD.

Only when I ran Software Update, it got stuck in the middle of the update and did not complete it. I restarted, tried again, left the Mac alone for hours, same deal, no go.

Finally I removed the bad internal SP SSD from the belly of the beast, replaced it with the external SSD with the fresh Mojave OS, booted, and OFF IT WENT! It proceeded with the update like a champ and finally the Mini was working again!

All I had to do was to bring back all the data I needed from the clone copy.

Afterwards I tried to Erase the SP SSD several times as an external drive, and after many long minutes, Disk Utility just could not complete the erase. So this drive is officially RIP.

4 years of use. Not a whole lot.

Wednesday, January 26, 2022

How To Change Gnucash Font Size On macOS Mojave 10.14.6

 Gnucash is a great Open Source accounting software, but the default fonts are quite small (Arial 10pt) there is no easy way to make the fonts bigger.

On top of it there seem to be many esoteric ways to achieve that outcome, which make searching for and finding a proper how-to quite daunting.

This is how I did it on macOS Mojave:

1) Go to the Gnucash.app

2) Right click and Show Package Content

3) Navigate to: Content/Resources/share/doc/gnucash

4) Select and COPY the file "gtk-3.0.css"

5) Navigate to: Mac HD/Users/Your Home Folder/Library/Application Support/GnuCash

6) Copy the file "gtk-3.0.css" into the GnuCash folder

7) Open the file with Text Edit

8) it  will look like the below lines of codes. Change the size of fonts (highlighted) to your liking and SAVE.

9) Restart Gnucash

10) You are welcome.


=== Content of "gtk-3.0.css" after opening it with Text Edit ===

/* This is an example GTK CSS file that can be used with Gnucash.

   Simply copy this file to the location specified below according

   to your platform and then restart gnucash.


  - Windows: CSIDL_APPDATA/GnuCash

    (or the default is users\%USERNAME%\AppData\Roaming\GnuCash)


  - OS X: $HOME/Application Support/GnuCash


  - Linux: $XDG_CONFIG_HOME/gnucash

    (or the default is $HOME/.config/gnucash)


  These settings are mainly to do with register colors and can be seen

  when the preference setting 'Register\Use GnuCash built-in color theme'

  is unset.


  Note: Widgets obtained from Glade files will not be addressable

  directly by name as these are not brought in when loaded, only

  the widget type can be configured unless they are named in code.

*/


/* Application wide font setting */

* {

  font: 10px arial;

}


/* Scollbar size */

scrollbar slider {

    /* Size of the slider */

    min-width: 20px;

    min-height: 20px;

    border-radius: 22px;


    /* Padding around the slider */

    border: 5px solid transparent;

}


/* Register sheet font setting */

gnc-id-sheet {

  font: 10px arial;

}


/* Register header font setting */

gnc-id-header {

  background-color: pink;

  color:blue;

}


/* Register cursor font setting */

gnc-id-cursor {

  background-color: #BDB76B;

  color: white;

}


gnc-id-cursor button {

  border-width: 1px;

  border-color: green;

}


/* Register sheet calendar */

gnc-id-sheet calendar {

  font: 10px arial;

  background-color:lightgreen;

  border-color: green;

  border-width: 1px;

}


/* Register User Colors, remove 'user' for builtin register values */

.gnc-class-user-register-header {

  background-color: seagreen;

  color: white;

}


.gnc-class-user-register-primary {

  background-color: pink;

}


.gnc-class-user-register-primary:disabled {

  background-color: plum;

}


.gnc-class-user-register-secondary {

  background-color: lightgreen;

}


.gnc-class-user-register-secondary:disabled {

  background-color: plum;

}


.gnc-class-user-register-split {

  background-color: lightblue;

}


.gnc-class-user-register-split:disabled {

  background-color: plum;

}


.gnc-class-user-register-cursor {

  background-color: #00BFFF;

  color: white;

  border-radius: 0px;

}


/* Toolbar Button size and spacing */

toolbar {

  background-color: darkgrey;

}


/* Toolbar font size, 0 to remove text */

toolbar toolbutton label {

  font-size: 0px;

}


toolbar toolbutton button {

  padding-left: 4px;

  padding-right: 4px;

}


toolbar toolbutton label {

  padding-left: 4px;

  padding-right: 4px;

}


/* Negative number color */

.gnc-class-negative-numbers {

  color: orange;

}


/* Gnucash Main Window, reduce size */

#gnc-id-main-window notebook tab {

  min-height: 0px;

  min-width: 0px;

  padding-top: 3px;

  padding-bottom: 3px;

  margin-top: 0px;

  margin-bottom: 0px;

  border-top: 0px;

  border-bottom: 0px;

}


#gnc-id-main-window notebook label {

  font: 14px arial, sans-serif;

}


#gnc-id-main-window notebook tab button {

  min-height: 0;

  min-width: 0;

  padding: 0px;

  margin-top: 0px;

  margin-bottom: 0px;

}


/* Dense Calendar Settings, use widget name gnc-id-dense-calendar

 * or gtk css name calendar which would also apply to other calendar

 * widgets */

#gnc-id-dense-calendar .frame {

  border-color: blue;

  border-width: 1px;

}


calendar .frame {

  border-color: blue;

  border-width: 1px;

}


#gnc-id-dense-calendar .header {

 background-color: lightgreen;

}


calendar .header {

 background-color: lightgreen;

}


#gnc-id-dense-calendar .primary {

  background-color: darksalmon;

}


#gnc-id-dense-calendar .secondary {

  background-color: darkseagreen;

}


#gnc-id-dense-calendar .markers {

  background-color: indianred;

}


#gnc-id-dense-calendar-popup {

  background-color: darksalmon;

  color: black;

}


#gnc-id-dense-calendar-popup treeview {

  background-color: lightcoral;

}


/* Progress bar */

progressbar progress {

  background-color: lime;

}


/* Status Bar */

statusbar frame {

  margin-top: 0px;

  margin-bottom: 0px;

}


statusbar label {

  font-size: 12px;

  color: red;

}


/* Reconcile Window */

#gnc-id-reconcile-totals * {

  background-color: darkgrey;

}


.gnc-class-credits treeview {

  background-color: pink;

}


.gnc-class-credits treeview:selected {

  background-color: cornflowerblue;

  color: white;

}


.gnc-class-debits treeview {

  background-color: lightblue;

}


.gnc-class-debits treeview:selected {

  background-color: cornflowerblue;

  color: white;

}


/* Highlight Text */

.gnc-class-highlight {

  color: blue;

}


/* Summary bar */

#gnc-id-summarybar {

  background-color:lightblue;

}


#gnc-id-summarybar .gnc-class-highlight {

  color: red;

}


Monday, January 24, 2022

USB Sub-Par Speed On Mac Mini M1 - Not The Advertised 10Gbps

 The confusion continues regarding the USB speed of devices connected to Thunderbolt3 ports on the Mac Mini M1.

In my experience USB devices rated for 10Gbps connected to the Thunderbolt3 ports are only recognized as 5Gbps.

The only exception so far is the OWC Dual Drive Dock, which is correctly recognized as 10Gbps, although it is far from reaching the theoretical speed.

OWC Drive Dock correctly shows up as 10Gbps device on the Mini M1 System Report (macOS Monterey 12.1)

Phantom Drives DUO enclosure, rated 10Gbps, showing up as 5Gbps on Mac mini M1 (macOS Monterey 12.1)

There are now many entries related to this problem on various Apple forums:

Usb4 (TB3 latest) on M1 computers - Apple Community

USB 3.1 Gen 2 drops to 5Gbps on M1 Mac mi ... - Apple

Mac mini (M1, 2020) - Technical specifications - Apple

https://eshop.macsales.com/blog/74780-faster-external-drive-speed-m1-mac/

Is it a chip issue? Is it a M1 issue? Is it an issue with Monterey? There is no answer from Apple or from the manufacturers of 10Gbps USB devices.

Apple has to address this issue and explain why we cannot get the advertised speed of 10Gbps. Manufacturers have to be clear on the speed of USB 10Gbps devices when connected to M1 Macs.

There are too many very useful and perfectly adequate USB 10Gbps devices on the market to ignore this unfortunate situation.

Cable Matters is the only manufacturer recognizing there is a problem with their 10Gbps Dual Bay HD Enclosure when connected to M1 Macs.

  • Mac M1 computers, laptops, and other devices with the M1 chip only support 5Gbps data transfer. Intel Macs are not affected by this limitation

Although that leaves us clueless as to why this is. I left a feedback with Apple, I encourage you to do the same.

Thursday, January 20, 2022

How To Position An Object Properly In A Scene After Camera Tracking - After Effects

 How to position your object/text/whatever properly after running After Effects 3d Camera Tracker.

For some reason I always fail to remember this simple step:

 After the tracking is done and the camera is solved by AE, right click on a point or a target and create Null+Camera.

The thing to understand is that this Null is the actual position where you want to add you 3D objet so that it feels like it belongs to the scene.

As a side note, if you have several objects in several places, you must have several corresponding Nulls.

Anyway back to inserting a 3D object into the scene. When you bring in a new object/image/watever, first click on the cube to make it a 3D layer. That will probably wreak it up and move the 3D object to a random place. Not to worry.

Remember at this point to not try to move the object by hand try and make it go where you think it should go. I always have a tendency to do that and I have to make an effort to not do it.

Instead select the Null to which the object is attached, hit P for position and select Position (the word) and Command + C for Copy. You are copying the Null position to the 3D object which makes sense because that's where it belongs!

Now select the 3D object and hit P again, select Position (the word) and Command + V for Paste. All XYZ positions for the object and its associated Null should now match.

Now wherever you scrubbing/playing in the timeline, the object will match the track rock solid and feel like it belongs to the scene.

You can adjust scale, anchor point and rotate the 3D object as needed, but do not change its position.


Wednesday, January 19, 2022

The Mac Mini M1 Sub-Par Speed Of USB-C Devices Connected To Thunderbolt 3

 Something is up with the Mac Mini M1 when connecting USB-C devices rated 10Gbps. They don't show up as such, instead they are downgraded to 5Gbps.

I noticed that the Phantom Drives DUO was only recognized as a 5Gbps device on my Mac mini System Report, even though it is advertised as a 10Gbps device on Phantom website. And I picked this enclosure because of the advertised speed.

Only I am not getting the speed I should get, instead it maxes out at around 360MB/s, that matches the theoretical 5Gbps max speed.

Same thing with the OWC Mercury Dual Mini enclosure, advertised at 10Gbps, actual tested speed around 360MB/s.

And on top of this, the same dual SSD Raid 0 array reaches 690-800MB/s on a Sonnet Pcie card, which is the expected speed for such an array.

I'm not the only one seeing this, as mentioned in this Reddit post:


What the heck Apple? So if the 10Gbps devices are only operating at 5Gbps with TB3, and the other USB ports are also 5Gbps, what are we supposed to buy to get the 10Gbps speed we want?

Are we forced to upgrade to 40Gbps TB3? Not many devices on the market, all much more expensive than USB 3.1 10Gbps. I understand why now.

And what about USB4? Do these devices even exist? Looks like compatibility is not even guaranteed ?...

UPDATE 1:

Oh boy, there is more to this problem in this Apple Discussion thread. Someone mentions a "bug" in macOS, someone else mentions "Some of those folks have found that using a Thunderbolt3 cable instead of a USB-C cable returned stability and performance."

Damn! I don't have a Thunderbolt3 cable at the ready to test this. That would be dandy if true.

UPDATE 2:

I ordered a Thunderbolt3 cable and I am sad to say that this solution DOES NOT WORK for me with the Phantom Drives DUO external enclosure. I have the same exact speed with USB-C cable or with Thunderbolt3 or Thunderbolt4 cables. Not good.

Speed with Thunderbolt3 cable, same as with USB-C cable

Speed with Thunderbolt4 cable, same as with USB-C cable

Sub-par speed with USB-C cable. Should be in the 800MB/s.


So at this point I will be returning the Phantom Drives enclosure. I already parted with the OWC Mercury Elite Pro Dual Mini, so I can't test it with a Thunderbolt cable unfortunately, but I don't really fancy the form factor anyway. If someone would be kind enough to do the test and add comments below that'd be great.

What's left? I guess there is no solution for using the Sonnet TSATS6 in a Thunderbolt3 PCIe enclosure. Being 12.28" in length it does not fit in the Highpoint RocketStor 6661A (max 7.87") or most Sonnet PCIe Enclosure that are half-length as well.

It would fit in the $899 Sonnet Echo3.  But whoa! That's an expensive box! And it certainly reduces the portability. I could fit two other cards in the enclosure in addition to the Sonnet dual SSD. My BMD Mini Monitor would go in right away. And later I could upgrade to a Mini Monitor 4K or a Decklink. And I would still have a third slot available... For what though?

I think for the time being I will use the SSDs as two separate 1TB drives and just forget Raid 0. Instead I will maybe start looking again for a 4 or 8 drives bay fit with HHDs.

Tuesday, January 18, 2022

Phantom Drives DUO Dual 2.5' USB-C Enclosure - Review

 My quest to find a dual enclosure to house two Sata SSDs at 10Gbps speed is still ongoing.

I reviewed OWC's Mercury Elite Pro Dual Mini enclosure last week, and it didn't meet my expectations. Namely the speed of the RAID 0 array composed of the two 1TB SSDs is not faster than a single drive. It should reach higher, maybe not the advertised max of 980MB/s, but at least faster than the around 360MB/s of a single Crucial SSD.

Today I'm testing another dual 2.5' enclosure, the Phantom Drives DUO (enclosure only).

And similarly I am not getting near the advertised "Up to 1000MB/s Read and Write". Instead I get the same as with the OWC's Mercury, a paltry 360MB/s in Raid 0, be it hardware Raid or Apple Raid, no difference.

As single drives in the Phantom enclosure, I get the usual 350-360MB/s.
Either SSD, (A) or (B) delivers the expected speed.
Now this is two SSDs configured as Raid 0 (Apple software) with basically the same speed as a single SSD. Not expected, not good.
And this is the same two SSDs as Raid 0 (Phantom hardware), same crappy speed.
More weird is that the Phantom enclosure only appears as a 5Gbps device in System Report, even though it is connected to Thunderbolt 3 via USB-C. On the Phantom website it is clearly described as a 10Gbps enclosure.
I already returned the Mercury Mini, so unfortunately I cannot check how it's being recognized by System Report.
By comparison, OWC's Dual Drive Dock is recognized as a 10Gbps device. And its speed with the same two Crucial 1TB SSDs is slightly better than either the Phantom or the Mercury Mini, around 550MB/s.
So far that's the best speed I can get on the Mac mini M1 with an external Raid 0 composed of two 1TB Crucial Sata SSDs. It's still 
slower than it should be.

The best speed of all, 800-680MB/s, an expected speed for dual SSD Raid 0, is only achieved with the Sonnet PCIe card in the Mac Pro 5.1
Why can't I get this kind of speed with USB-C enclosures rated for 10Gbps connected via Thunderbolt 3 on the Mac Mini M1?

I don't get it. Any ideas? Please comment.