Monday, February 14, 2022

How To Run DisplayCal On Mac Mini M1

Since I upgraded to a silicon Mac M1, the Mac mini 2020, with macOS Monterey, I had to calibrate my dual monitors using DisplayCal. Only it would not work.

After searching for an answer, I found this very helpful post on Macrumors forum by user divinebaboon. Lovely name.

I ran my own experiment and it worked. Very similar to what's described in the post above, with a few differences.

I have one monitor connected via HDMI and a second monitor connected to a USB3 Type-C to HDMI hub. Both monitors are Viewsonic VX2370, OK for my use, not the best monitors around certainly. I'm using XRite i1 Display Pro puck for measurement.

Here is how I did it:

1) Download the current DisplayCal App at https://displaycal.net/#download. I got the "For Mac OSX (10.6 or newer), click on "Installer Package".

It brings you to a SourceForge page and downloads DisplayCal v. 3.8.9.3

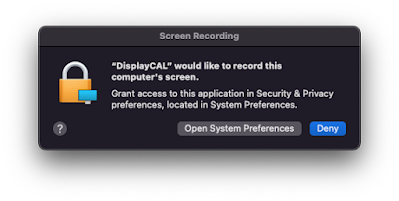
2) Install DisplayCal. It will show a window to allow DC to record your monitor, open System Preferences and allow it.


3) Plug your measuring device, start DisplayCal. It will prompt you to install the latest Argyll library. Do it, it will download an older version V2.1.2 as mentioned in the post. Quit DC.

4) Go to: https://www.argyllcms.com/downloadmac.html and download the latest executables. In my case v2.3.0

5) Untar the Argyll package with Unarchiver or your app of choice. It will look like this:

6) Go to: User/Library/Application Support/DisplayCal, and look into the "dl" folder. You will see the Argyll_V2.1.2 folder. Trash it and Empty Trash.

7) Move the Argyll_V2.3.0 folder into this dl folder. It should now look like this:

8) Restart DisplayCal, if it asks again for the Argyll Library, click on File/Locate ArgylCMS executables, and point it at the bin folder.

9) Start calibration. macOS will complain multiple times about Argyll executables that cannot be opened because the developer cannot be identified. Each time this happens, go to the Argyll_2.3.0/bin folder and manually open each executable by right-clicking on it. Then click on the alert Cancel button.

Here is an example with "iccgamut":

Right-clicking on iccgamut forces run the executable in Terminal:

Click Cancel only after Terminal is running the executable and the process is completed.

10) You have to do this each time macOS blocks an executable and it happens at different times during the calibration which lasted 9min. in my case. Eventually it goes through it all. Next time macOS should not block the executables, but if it does, employ the same technique.

11) On reboot DisplayCal sees both monitors just fine:

VX2370 (1) and (2) detected.

12) In my case I set the (Pre) Calibration Whitepoint to 6500K, White Level to 120cd/m2, and Tone Curve to Gamma 2.2 in DisplayCal.

I reset the monitors completely, switch the color profile from Native to User Color and adjust the RGB settings and the brightness setting to optimize them in the Interactive Display Adjustment. I do not adjust anything else in the monitors.

The VX2370 is not a performance monitor. I only just adjust the Colors and Brightness to be in the target ranges, I leave every other monitor settings to default.

13) The calibration goes through its paces. Click on Install profile and you are done. Do the same for the second monitor. Success!

One more thing: Sometimes DisplayCal freezes after the Install Profile, just force quit. Also randomly, one or both monitors will black-out when closing DisplayCal windows, like the Interactive Display Adjustment window. Just unplug and replug the HDMI cable and the signal will come back.

If you can, please contribute to the development of DisplayCal.


Thursday, February 3, 2022

Silicon Power SSD S55 Gone Burst After 4 Years

 Bought this Silicon Power Sata SSD 480GB in March of 2018. Yesterday, Feb 2 2022 it went kaput.

Silicon Power 480GB SSD 3D NAND S55 TLC 7mm

 It replaced an internal rotating drive in my Intel 2012 Mac Mini. The Mini is in use all day everyday from light to mild use in terms of data read/written. And a few weeks in the year it's put to heavy use. I have no idea how much that represents in terms of data size R/W unfortunately.

 In any case this is a SHORT lifespan for a SSD. Granted in was one of the cheapest back when I bought it, and SP have not won the price for reliability of their products that's for sure.

 Lesson: ALWAYS HAVE AN UP TO DATE BACKUP OF YOUR DATA. Best of course is to have several copies, but at least have one. I had an up to date clone (and a copy from last month) of the entire Mac mini Boot drive made with CCC. It has saved my bacon more than once.

 Now for the sequence of events: I noticed the Mac slowing down for a few weeks before, was getting the beach ball while on Safari or doing mundane actions. Didn't pay too much attention to it, only I made sure my clone was up to date. Left the clone drive attached and CCC to backup everyday.

In the morning this message popped from Adobe Creative Cloud:

"Adobe Creative Cloud is needed to resolve this problem. However it is missing or damaged."

Couldn't do a screen grab as you can see, as everything was slow like molasses. OK, so red alert ensued. I restarted from an external USB Mojave Boot Installer, fired Disk Utility and First Aid, which found the fsroot tree invalid and could not repair it. (The SSD was formatted APFS.) I tried a few times, same results, no go.


I tried to re-install Mojave to no avail. The installation would hang in the middle and not go through. I tried to erase the SSD and do a clean install, that failed as well.

Install frozen and not going anywhere.

I then decided to install a clean Mojave onto a new external SSD. I booted again from the USB Installer and that worked. The installation went through and I was able to start from the external SSD.

Only when I ran Software Update, it got stuck in the middle of the update and did not complete it. I restarted, tried again, left the Mac alone for hours, same deal, no go.

Finally I removed the bad internal SP SSD from the belly of the beast, replaced it with the external SSD with the fresh Mojave OS, booted, and OFF IT WENT! It proceeded with the update like a champ and finally the Mini was working again!

All I had to do was to bring back all the data I needed from the clone copy.

Afterwards I tried to Erase the SP SSD several times as an external drive, and after many long minutes, Disk Utility just could not complete the erase. So this drive is officially RIP.

4 years of use. Not a whole lot.